

Description
In electronics projects, creating an interface between user and system is very important. This interface could be created by displaying useful data, a menu, and ease of access. A beautiful design is also very important. There are several components to achieve this like TFT Displays. For more information Click Here
TFT LCD is a variant of a liquid-crystal display (LCD) that uses thin-film-transistor (TFT) technology to improve image qualities such as addressability and contrast. This can be achieved by TFT display provided by STONE Technologies. They are a professional manufacturer of HMI (Human-Machine Interface) Intelligent TFT LCD module. Their core TFT LCD display modules integrate a CPU, flash memory, and touch screen in the hardware unit. Paired with an easy-to-use free GUI design software and complete instruction set for more click here.
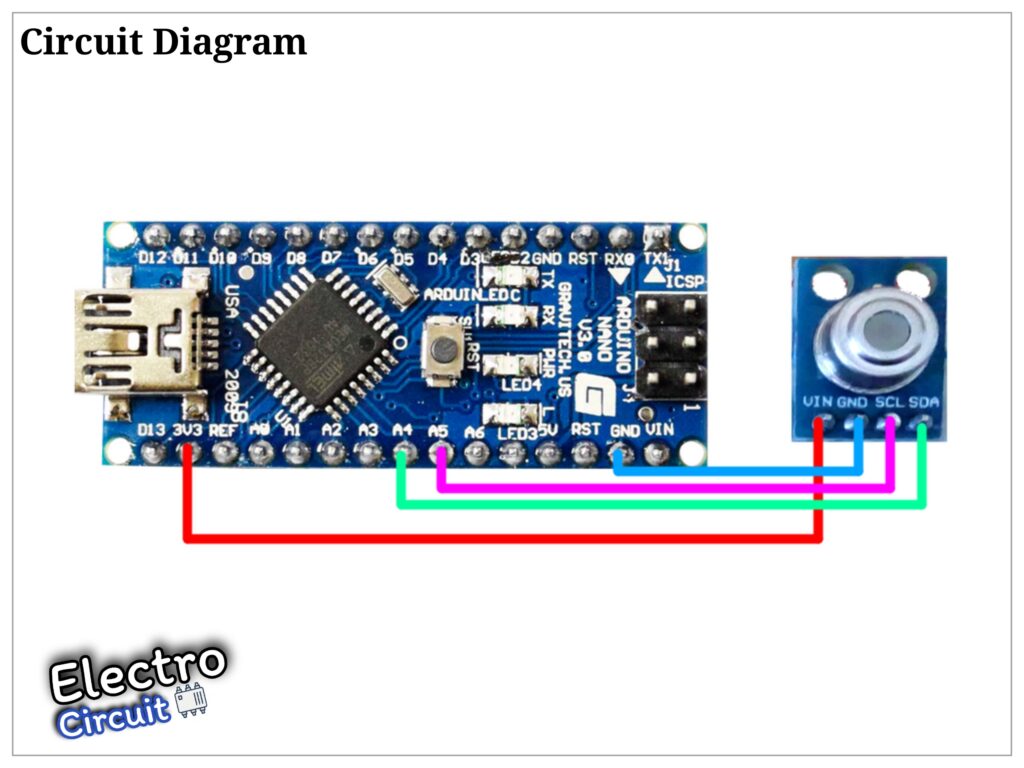
Circuit Diagram

For information about the TFT display visit Stone website Click Here.
Working
The connections can be done as per circuit diagram provided above .Here the Infrared Temperature Sensor can be used to display the temperature at the TFT display. This project’s simplicity ensures that anybody interested can perform and implement the project and essentially, can follow this tutorial themselves. We will mainly utilize an Infrared Temperature Sensor to detect an object’s temperature without any contact at all and to also sense the ambient temperature surrounding this sensor. The results will be displayed on the TFT display. Many real-world applications uses an infrared temperature sensor to either be an aid for the user or for autonomous monitoring, and some of those applications include: body thermometers, fire detectors, water heaters, room heaters etc. Now, let’s get into this project, but make sure you have the following parts:
– Infrared Temperature Sensor
- Arduino
– TFT display (Click Here) To buy this product used in the project.
- Jumper Wires
– USB Data Cable (For Arduino)
For more information about the project Click here.
Arduino Code
#include <Wire.h>
#include <Adafruit_MLX90614.h>
Adafruit_MLX90614 mlx = Adafruit_MLX90614();


#include <SoftwareSerial.h>
SoftwareSerial screenserial(2, 3); // RX, TX

#define ta 0x86
#define tb 0x87

unsigned char ta_send[8]= {0xA5, 0x5A, 0x05, 0x82, 0x00, ta, 0x00, 0x00};
unsigned char tb_send[8]= {0xA5, 0x5A, 0x05, 0x82, 0x00, tb, 0x00, 0x00};
int x=0;
int y=0;

void setup() {

  mlx.begin();

  Serial.begin(115200);
  screenserial.begin(115200);

}

void loop()
{
  x=mlx.readAmbientTempC();
  y=mlx.readObjectTempC();


  ta_send[6]=x/256;
  ta_send[7]=x%256;
  screenserial.write(ta_send,8);

  tb_send[6]=y/256;
  tb_send[7]=y%256;
  screenserial.write(tb_send,8);

 Serial.print("Ambient ");
 Serial.print(x);
 Serial.println(" C");

 Serial.print("Target  ");
 Serial.print(y);
 Serial.println(" C");

 Serial.println("-----------------------");
 delay(100);
}