
Description
In this I’m going to make a finger counter with the help of media-pipe library and finger count will display on the seven-segment LED. For this will require software and some hardware components and here I’m using C and python because Arduino code is written in C and the sending code that is which is communicating with Arduino is written in Python so let’s move further and make this project, below are the list of component and software which you will required in this project.
Component & Software
Components
[1] Arduino
[2] Seven-segment LED
[3] Jumper Wires
[4] USB connector
Software
Python Code & working
Let’s understand how it’s working. Here I’m using ‘cvzone’ .This is a Computer vision package that makes its easy to run Image processing and AI functions. At the core it uses OpenCV and Mediapipe libraries, and this library has many inbuilt function in it for this project I am using Hand Tracking function from that. This function has many features in it. For this function we will use this command to import this as given below.
from cvzone.HandTrackingModule import HandDetector

Here this hand detector has two parameters , first one is ‘detectionCon’ which vary from 0 to 1 and it indicates how much you want to make it precise when you select 1 then it will detect hand if your hand is clearly visible in the camera or I can say this will give you high efficiency so select according to your requirement. Here I have selected as 0.8 because it was giving me a perfect output at the time of making so I have selected this value.
HandDetector(detectionCon=0.8, maxHands=1)
And another parameter is ‘maxhands’ this has 1 or 2 values, that is if you write 1 here you can able to detect the one hand only and if you write here 2 then you can detect two hand from the camera.
Let’s understand how python code is working and how it is sending number of fingersUp data to the Arduino?
Code :-
import serial
import cv2
import cvzone
from cvzone.HandTrackingModule import HandDetector
serialcomm = serial.Serial('COM3', 9600)
serialcomm.timeout = 1
cap=cv2.VideoCapture(1)
detector = HandDetector(detectionCon=0.5, maxHands=1)
while True:
    success,img =cap.read()
    img=cv2.resize(img,(500, 350))
    img=detector.findHands(img)
    l,box = detector.findPosition(img,draw=False)
    if l:
        f=detector.fingersUp()
        s=(list(map(int,f)))
        w=0
        e='\n'
        for q in s:
            w +=q
        serialcomm.write(e.encode())
        serialcomm.write(str(w).encode())
    cv2.imshow('Image',img)
    if cv2.waitKey(20) & 0xFF == 27:
        break
cv2.destroyAllWindows()
At line number-5 there is a serial library which is responsible for sending the data to Arduino serially.
serial.Serial('COM3', 9600)
Here there are two parameters first one is port number in which our Arduino is connected and another one is Baudrate at which we are communicating with Arduino. Here in my case port number is 3 that is ‘COM3’ and Baudrate is 9600.
Let’s understand how data is collecting?
For this see the while loop which is a infinite loop it will continue until escape button is pressed . In this first i am reading the image from camera with the help of OpenCV library which I have imported and then this image is resized as per requirement , if you want big window size you can increase the values of its parameter. Then this image giving to detector function to recognized the hand from that video. After this there is if condition that ,if hand is recognized then collect the fingerUp data and then I have converted this data into list , and this list has five fingers coordinate value , but we only want number of finger so that is why I have map it and and pass it through a for loop using a variable ‘w’ which collecting the number of fingersUp data.
Now our data is ready for send to the Arduino. These below two lines are responsible for seeding the data , in which first line is for the detection of data through Arduino here Arduino will receive data when first this ‘\n’ character is received. then is receiving fingersUp data and after receiving there are some condition in the Arduino code to display particular count, this thing will understand in Arduino section.
serialcomm.write(e.encode())
serialcomm.write(str(w).encode())
But before this you should have all the library which we have used in Python code. If you do not have these, these are the commands for installation. Run these command in the Command window.
[1] pip install pyserial
[2] pip install opencv-python
[3] pip install cvzone
Arduino Code & working
String arrivingdatabyte;
int a=4,b=5,c=17,d=18,e=19,f=3,g=2;
void setup( )
{
Serial.begin(9600);
pinMode(a,OUTPUT);
pinMode(b,OUTPUT);
pinMode(c,OUTPUT);
pinMode(d,OUTPUT);
pinMode(e,OUTPUT);
pinMode(f,OUTPUT);
pinMode(g,OUTPUT);
}
void loop( )
{
if(Serial.available( ) > 0)
 {
    arrivingdatabyte = Serial.readStringUntil( '\n');
    if(arrivingdatabyte=="1")
     {
       digitalWrite(a,HIGH);
       digitalWrite(b,LOW);
       digitalWrite(c,LOW);
       digitalWrite(d,HIGH);
       digitalWrite(e,HIGH);
       digitalWrite(f,HIGH);
       digitalWrite(g,HIGH);
     }
     if(arrivingdatabyte=="2")
     {
       digitalWrite(a,LOW);
       digitalWrite(b,LOW);
       digitalWrite(c,HIGH);
       digitalWrite(d,LOW);
       digitalWrite(e,LOW);
       digitalWrite(f,HIGH);
       digitalWrite(g,LOW);
     }
      if(arrivingdatabyte=="3")
     {
       digitalWrite(a,LOW);
       digitalWrite(b,LOW);
       digitalWrite(c,LOW);
       digitalWrite(d,LOW);
       digitalWrite(e,HIGH);
       digitalWrite(f,HIGH);
       digitalWrite(g,LOW);
     }
      if(arrivingdatabyte=="4")
     {
       digitalWrite(a,HIGH);
       digitalWrite(b,LOW);
       digitalWrite(c,LOW);
       digitalWrite(d,HIGH);
       digitalWrite(e,HIGH);
       digitalWrite(f,LOW);
       digitalWrite(g,LOW);
     }
      if(arrivingdatabyte=="5")
     {
       digitalWrite(a,LOW);
       digitalWrite(b,HIGH);
       digitalWrite(c,LOW);
       digitalWrite(d,LOW);
       digitalWrite(e,HIGH);
       digitalWrite(f,LOW);
       digitalWrite(g,LOW);
     }
     if(arrivingdatabyte=="0")
     {
       digitalWrite(a,LOW);
       digitalWrite(b,LOW);
       digitalWrite(c,LOW);
       digitalWrite(d,LOW);
       digitalWrite(e,LOW);
       digitalWrite(f,LOW);
       digitalWrite(g,HIGH);
     }
  }
 Serial.println(arrivingdatabyte);
}
Above code is for Arduino , this code is receiving the data from laptop/PC through serial communication for this I’m using Serial communication that is UART. Let’s understand how code is working?
arrivingdatabyte = Serial.readStringUntil( '\n');
This above line of code is responsible for receiving the data serially which is sending through Python code .which we have written above. And as you saw we used ‘\n’ for to send the data and here this code of line will receive data when this character receive. After this data is collecting in this variable ‘arrivingdatabyte’ .
After receiving data from that variable , I have developed condition for the counting. In this ,if I received ‘1’ I have developed a condition according to this, that is 1 will display on seven segment and below is the code for to display ‘1’ on segment.
if(arrivingdatabyte=="1")
{
digitalWrite(a,HIGH);
digitalWrite(b,LOW);
digitalWrite(c,LOW);
digitalWrite(d,HIGH);
digitalWrite(e,HIGH);
digitalWrite(f,HIGH);
digitalWrite(g,HIGH);
}
Similarly I have developed this condition for 1-5 counter.
After done with Let’s connect the Seven-Segment LED with Arduino. Do the circuit connection as per the below circuit. In this circuit I am using Common Anode Seven-Segment LED, so if you are using this you do not have to change any thing in the code but if you are using Common Cathode then replace HIGH as LOW and LOW as HIGH.

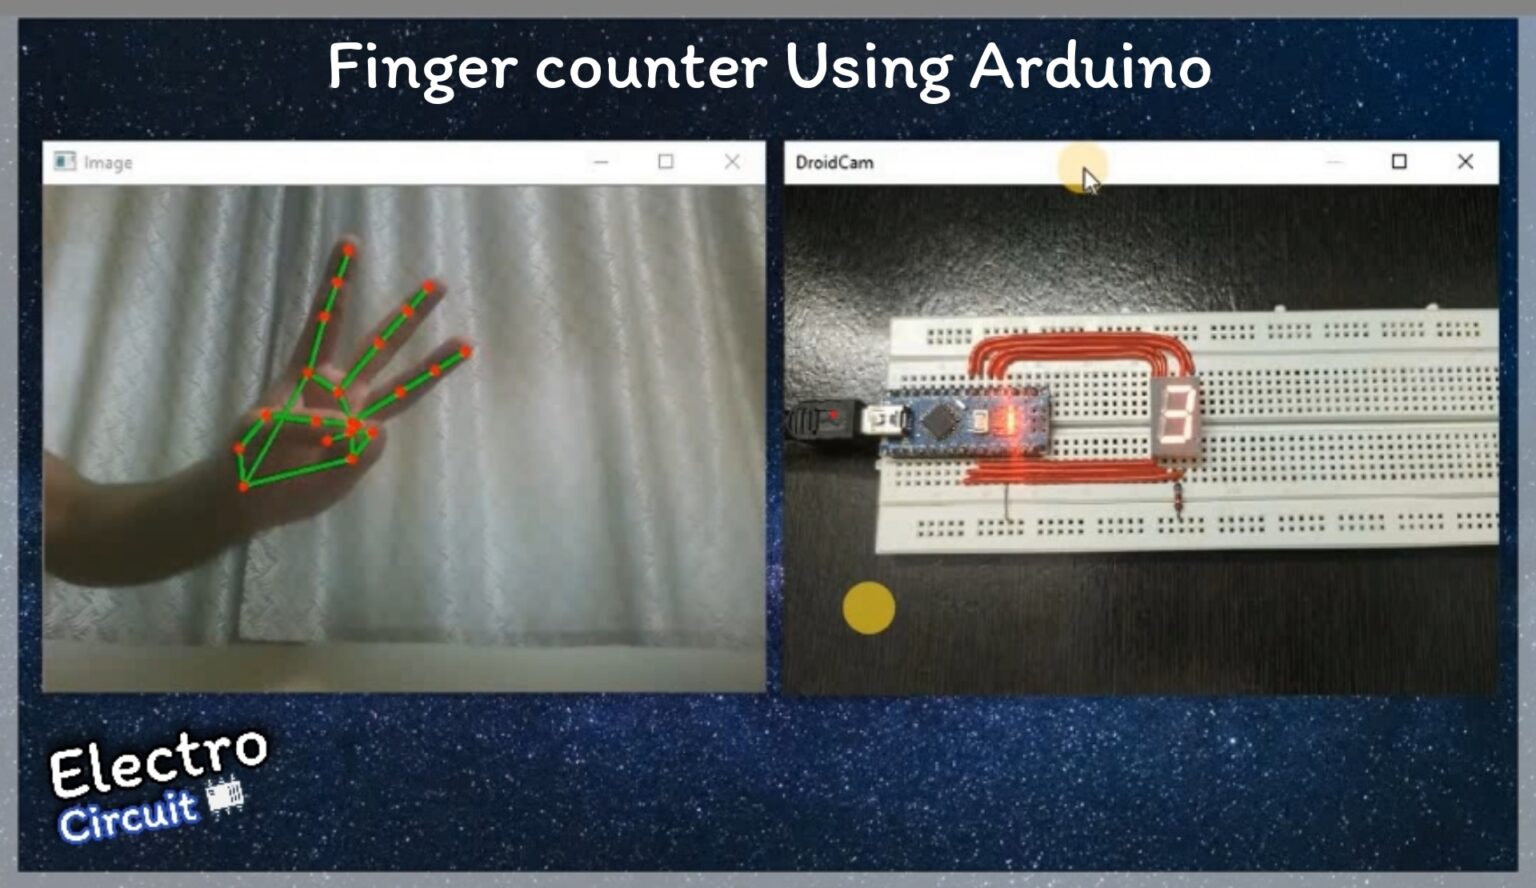
Now let’s upload code by clicking on Upload button in Arduino IDE. After done with now we will run our Python code which we have created in the starting of this project so copy that code from there and save as with .py extension example Python-code.py then run it as per the image given below.
Command for run is (python filename.py) write this line in command window and then press Enter button. And do not forget you should be at same location where your file is present.

Now we have completed with this project. Below, with output vide0 YouTube video also given , if you have any doubt or not understand well go and check out YouTube video.
Output Video
[6] YouTube Video
Thankyou so much to read the article till now there is YouTube video on this project so please go through that video to understand the whole procedure in a better manner there is link for video go and check it out.
