

What is Tuya IoT platform
Tuya is a large platform for IoT , here there are many options Tuya has own devices also from here you can connect that devices. It gives a platform to a developer to make its own devices by changing firmware also so this thing make it very interesting for developers.

It also has SDK(Software Development Kit) which doesn’t required a specific platform and operating system. And this SDK implemented in C language it only need to support TCP/IP protocol stack and provide the necessary system dependent interfaces of the SDK to complete the integration. So Raspberry pi is better to Implement this thing but there are others way also but in this article we will implement or connect Raspberry Pi with Tuya IoT platform so let’s start.
Hardware & Software
Software :-
[B] Tuya Smart Mobile Application
Hardware :-
[A] Raspberry-Pi
[B] Temperature Sensor
[C] LEDs
[D] Jumper Wires
Product Development & GUI Designing
So now let’s start with product development part, this part contains all functions development, will start with first product development then GUI design.
[A] Product Development :-
Product development has few steps will follow those to make it easy.
Step-1 :– First we have to go Tuya IoT Platform for login ,if you don’t have account on Tuya just create it otherwise fill the details and login your Tuya IoT Platform
There is link for this Platform click here

Step-2:- And this will take you on IoT platform where you will get many options to create a product, click on create button and here we are going to search for raspberry Pi and to Implement SDK we will click on ‘can’t find the category’ and proceed further.

Step-3:-Then you will get this type of interface fill all information here as given above. After done this click on create button this will take you on ‘Function Definition‘ page and here click on ‘Add’ button of Custom function’ as given below in the images follow this.

In custom function will add three function these function has certain data type and values range, let’s add these function one by one.
Now Add function for LED1. It has value as True and false as data type because this LED1 has only two state On or either Off. Follow steps to add the LED1 function in your product/project which are give below. And this LED1 function has DP value as 101 which will use in the Raspberry-Pi code.

Similarly add the function for LED2, here LED2 has a variable brightness as you saw in the output, so it will take a variable data value from 0-100, so let’s add this function in the custom function. This function has 102 as DP value.

Now will add last function which is a Temperature sensor function. And will give the temperature range from 0-100, so it also has a range type data-type and this function has Dp value as 103. Follow the below image to add this function.

Now we have successfully added all function in the function definition. See the result in the below image.

[B] GUI Design :-
Now Let’s move toward the designing of interface for Mobile application. For this just go to Device Panel and select blank panel for design then you redirect to this screen as given below.

Now here add the all function here by drag them as per you requirement or choice then this GUI will look like this as given in below image.

After that click on save then click on release button, this process take some time to apply the changes. At the end it will ask for the test or apply here click on test button to test the GUI , is it working or not ?.
So now test it for testing you have to put email ID which is logged in your mobile then scan the QR code as given in the below image.

After tested click on apply then this GUI will apply on this product. Now we have done with product development part now its time to generate the License to connect with the Link SDK.
Get the License
For download the License list go to the Hardware development and then select ‘Link SDK’ after that select General CPU as given in the image.
Then click on Select button and then you will get option for free license click on that and proceed further and place the order.

After placed you have to wait for some then it will show a download option, download that file in that you will find UUID 7 Authkey which will require in the coding part, so save it for later.

Raspberry-Pi Code
Now first connect the Raspberry-Pi through VNC server, if you want you can use through display also. Before run the code we have to install library and the SDK in Raspberry-Pi.

These are the commands to install Library and SDK folder in Raspberry-Pi.
[1] git clone https://github.com/tuya/tuyaos-link-sdk-python.git
[2] python3 -m pip install ./tuyaos-link-sdk-python
[3] python3 ./outlet.py
Let’s run first command in the terminal of Raspberry-Pi. After that run second command then you will get this type of screen in Raspberry-Pi.

Now we have successfully installed the these thing now its time to run the code for which we have designed. But before this update the some parameter in the ‘outlet.py’ file which is present in the ‘Tuya Link SDK python’ folder, go and open that file and change the product , UUID and Authkey in this file.
All these parameter with you now. In license list you will get UUID and Authkey and from your product you will get Product ID put all these parameters/ID in this file. And do the modification in” on_dps()” function. According to this project we have done the modification in “outlet.py” and you can find the final code below.
Raspberry-pi Code:-
##########-Sensor-############
from smbus2 import SMBus
from mlx90614 import MLX90614
bus = SMBus(1)
sensor = MLX90614(bus, address=0x5A)
#############-LEDs-#############
import RPi.GPIO as GPIO
GPIO.setmode(GPIO.BCM)
GPIO.setwarnings(False)
led1= 19
GPIO.setup(led1,GPIO.OUT)
led2= 26
GPIO.setup(led2,GPIO.OUT)
p = GPIO.PWM(led2,100)
p.start(0)
y=0
x=0
#############-Tuya_SDK-###############
import time
import coloredlogs
from tuyalinksdk.client import TuyaClient
from tuyalinksdk.console_qrcode import qrcode_generate
coloredlogs.install(level='DEBUG')
client = TuyaClient(productid='cb0euh3fjcdneis0',
                    uuid='tuya82f1b3a2cbe146bc',
                    authkey='VH3e7MxaUlf42zPCwiy3VI2yqJmgBynq')

def on_connected():
    print('Connected.')

def on_qrcode(url):
    qrcode_generate(url)

def on_reset(data):
    print('Reset:', data)

def on_dps(dps):
    print('DataPoints:', dps)
    ##############-For_LED1-################
    if(dps=={'101': True}):
        GPIO.output(led1,GPIO.HIGH)
    elif(dps=={'101': False}):
        GPIO.output(led1,GPIO.LOW)
    ##############-For_LED2-###############
    elif(dps['102']>=0):
        y=dps['102']
        p.ChangeDutyCycle(y)
    #############-Sensor_Data-#############
    dps['103']=x

    client.push_dps(dps)
client.on_connected = on_connected
client.on_qrcode = on_qrcode
client.on_reset = on_reset
client.on_dps = on_dps
client.connect()
client.loop_start()
while True:
    x=int(sensor.get_object_1())
    time.sleep(0.5) #0.5sec
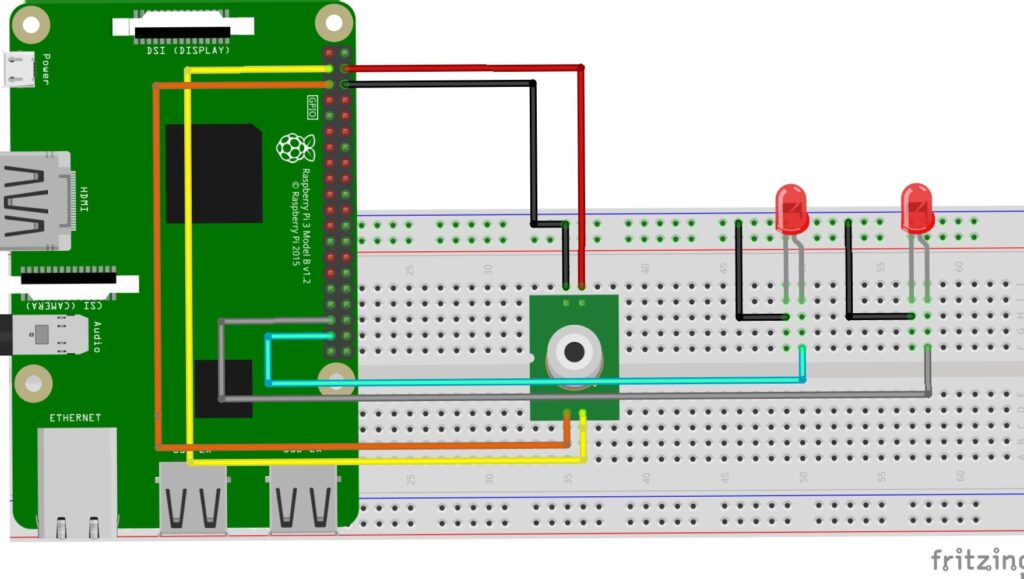
Now we have done all the changes in final file now before run the code connect the circuit as per the circuit diagram, which is given below.
Connection/Circuit :-
After connection now click on run button and you will get a QR code on the terminal as shown in the below image.
Note :- To run the code this is the command : python3 ./outlet.py


Just scan QR by using mobile Tuya Smart application, and you will found a device in you application as shown above. Now we have completed with all steps and its working now, check the output video below.
Output Video
YouTube
Thankyou so much to read the article till now there is YouTube video on this project so please go through that video to understand the whole procedure in a better manner there is link for video go and check it out.

Summary :- Raspberry Pi is connected to the Tuya Cloud and can be linked with ‘Powered by Tuya’ devices. People can try to connect other devices to Tuya Cloud by using link SDK too.